Good things to eat

Archive for the ‘Cheese’ Category

The Nine Course Affair

Speaking of birthdays…….

From time to time, the Chef and I like to put on “special dinners”.  Usually consisting of  a several coarse tasting menu.  He does most of the cooking, while I do the arranging, the shopping, the decor and the clean up.  And if I’m lucky, sometimes I actually am allowed to make a dish or two myself!


_________________________________________________________________________

First Course:

Seared Tuna, Avocado and Red Pepper Sushi

I have to admit, the Chef does a nice sushi, which is good because I only ever eat sushi at home, what with the shell-fish allergy, eating it in restaurants is just too high risk.


Sushi


Second Course:

Belgian Endive and Mini Kale Pancakes topped with Smoked Gorgonzola and Candied Walnuts

This was a tasty one.

They don’t show up that well in this picture, but I made mini versions of my famous Kale Pancakes.  Then to add some freshness to it all, they were alternated with leaves of Belgium endive.  Then both were topped with a small slice of smoked Gorgonzola cheese and a chunk of candied walnut.

We often enjoy this as an anytime snack.


endive & kale pancake


Third Course:

Beet Carpaccio Salad with Arugula, Blood Orange and Shaved Boursin Cheese

I really like beets, so I always encourage the Chef to somehow incorporate them into our special dinners.

So on this occasion, he thinly sliced both red and golden cooked beets.  Then topped them with super thing slices of Boursin Cheese, ( I’ll tell you another time about how he does that, because if you have ever dealt with Boursin, you know that slicing it in any way isn’t easy!) slices of blood orange, arugula and then drizzled with a raspberry vinaigrette.

Very refreshing.

Beet Salad


Course Number Four:

Halibut  “Fish and Chips”

This was a whimsical item.  The “fish and chips” refers to the halibut being roasted with grated yam on top and then drizzled in a balsamic dressing.   The yams form and nice crust (chips) and keep the halibut moist (fish) and then vinegar on top.

Halibut


Course Number Five:

Spinach and Pine Nut Stuffed Chicken Breast with roasted Celeriac Puree and marinated Red Cabbage

I hate to be judgemental, but I think this one was my favorite dish of the night.  The chicken was moist and flavourful, the celeriac both sweet and earthy at the same time and the crunch sourness of the cabbage just all really worked well together.  Oh and I didn’t even mention the delicious grainy mustard sauce in the title ( made it too long to look good on the page)!


Stuffed chicken


Course number six:

Shaved Brussel Sprout Salad

I actually got to make this course myself.  It is a favorite of mine to make and to eat and it often shows up on our special dinner menus.  But I can’t take the credit for it.

It is blatantly stolen from the menu at celebrity Chef Michael Chiarello’s Napa Valley restaurant, Bottega.

We tasted it there awhile back and I was determined to recreate it.  But luckily for me, they were generous enough to just post the recipe on-line!

So please do try it out for yourself.  It is surprisingly wonderful.

Brussel sprout salad


Course number seven:

Mediterranean Lamb & Bell Pepper Kebobs with Cous Cous and Kaffir Lime Leaf Scented Demi-Glace

It is a little joke we have with the birthday guest.  Inevitably whenever we go to her place for dinner, she serves lamb!  So it only seemed fitting that there should be a little lamb on her birthday party menu. The startlingly delicious item in this dish was the Kaffir lime leaves.

They don’t really show in the picture but they were in the sauce.  At this point in the evening ( course seven) sticking one’s fingers in the food and pulling out the lime leaves and sucking on them was clearly NOT frowned upon.  What a delightful taste, the tart lime flavour mixed with the luscious demi glaze.


Lamb


Course number eight:

Cheese & Apple

It seems we were just too delirious by this point to actually remember to take a picture.

We had retired to the lounge for a little reprieve before moving on to desert but just wanted to add this extra little treat to the mix.

Norwegian Ski Queen cheese, is just a delightful thing to try.  Although it is a cheese, it would remind you more of a really rich version of those caramel square candies that we used to get a Halloween. Perhaps those crossed with butter or some other unbearably delicious creamy substance.  You really do need to try it.  We find it in the speciality cheese section of most major grocery stores.

So our eighth course was slices of Ski Queen matched with slices of Ambrosia Apples lightly dusted with fresh cracked black pepper.

Really nice.

( No Photo Available )


Course number nine:

Raw Chocolate Tart topped with Pomegranate accompanied with fresh chunks Pineapple and Chocolate dipped Candied Ginger.

I also got to make this one!

If you have been following this blog for a while, you know that I like to startle people from time to time with my “raw” dishes.  So after a somewhat decadent night so far, I thought why not toss in something a little healthy to end the evening and leave us feeling good about ourselves!?


Cake


It was a very successful evening.  Good times all round.

Stay tuned for when the next one happens.  Who knows, YOU might even get invited!


Thumbs up

Ah, the left overs – Turkey macaroni and cheese

It’s always a challenge, what to do with the left overs?

And let’s face it by now we are all SO sick of eating that even the prime freshly cooked food seems grim, let alone eating the same stuff for three days!!

Well, here is this year’s offering to help use up a few items!

*****************************************************************************************

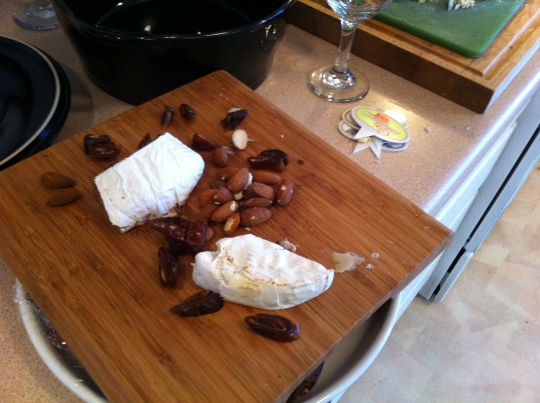
Ever find yourself with some dregs of cheese left over from a lovely cheese plate?  Bits and bobs of perfectly still nice cheese that you paid good money for so you don’t want to just toss it out, but it’s gotten a bit dry or tired looking from sitting out or not being properly wrapped and being shoved in the fridge after a night of merry-making?


Left over bits of cheese

Left over bits of cheese


*

Holiday treats010

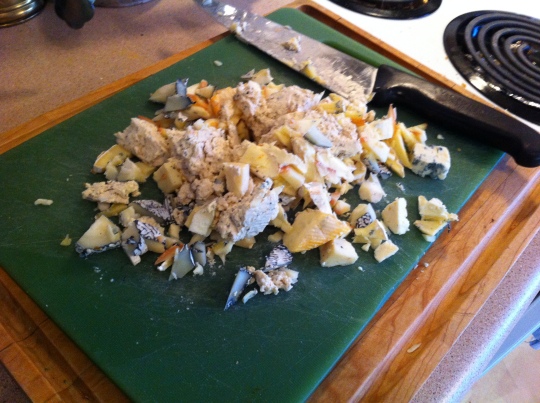
Finely chop up all the left over bits of cheese, removing any heavy rind.


And of course who doesn’t  have some left over turkey??

Well……how about………

Turkey Macaroni and Cheese?

I didn’t even have any “actual” macaroni but it have some spiral pasta in the pantry, which worked just fine.

Here’s how it went down.

Boil up a few cups of pasta of your choice.

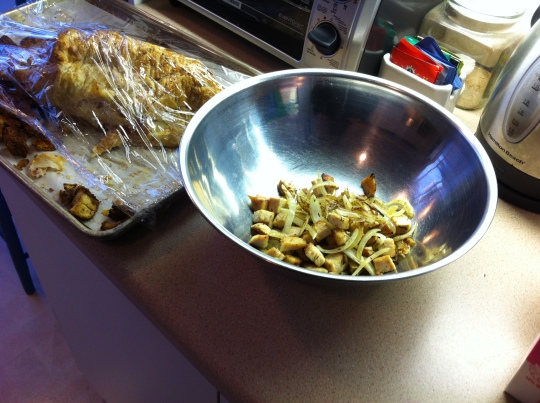
Meanwhile, in a skillet, fry up some onions and some cubed turkey.  You could even toss in some veg at this point if you had it, but I didn’t.


Sauteed turkey cubes and onion

sautéed turkey cubes and onion


Then, in a sauce pan, make up a cheese sauce according to your favorite recipe.

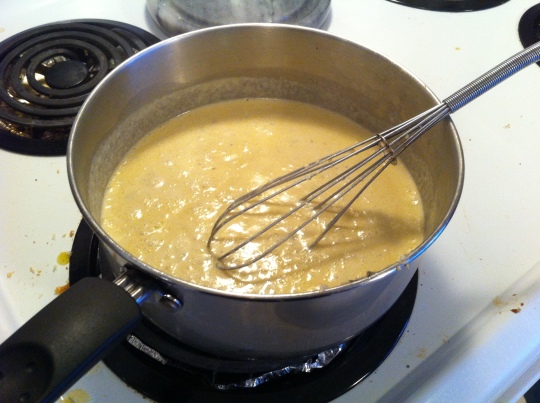
I used a bit of butter and flour.  Made a roux and added milk.   Then gradually added the bits of left over cheese from the cheese platter, finely chopped.  Be careful with any that have a heavy rind that won’t melt down.


Holiday treats013

Cheese sauce from left over party cheese plate


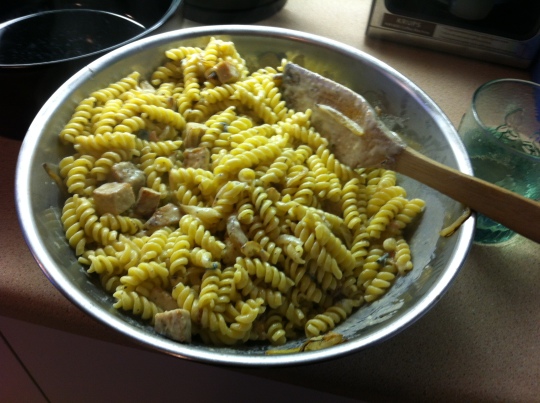
When the pasta is cooked, the turkey and onions sautéed and the cheese sauce made, mix them all together in a large bowl till thoroughly combined and then transfer to the casserole dish of your choice.


Holiday treats014

Mix all ingredients together and transfer to a baking dish


Now here’s where things got CRAZY…..

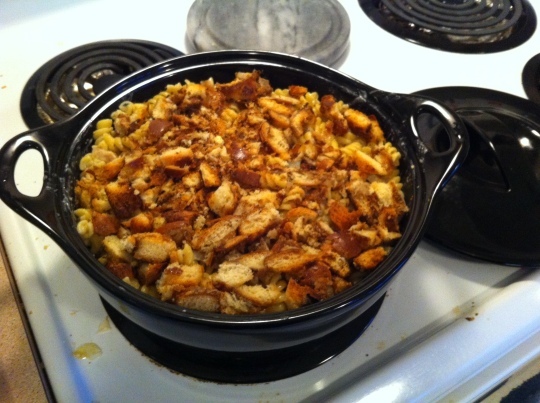
I didn’t have any bread crumbs so I chopped up some left over bread stuffing and spread it over the top!


Holiday treats015

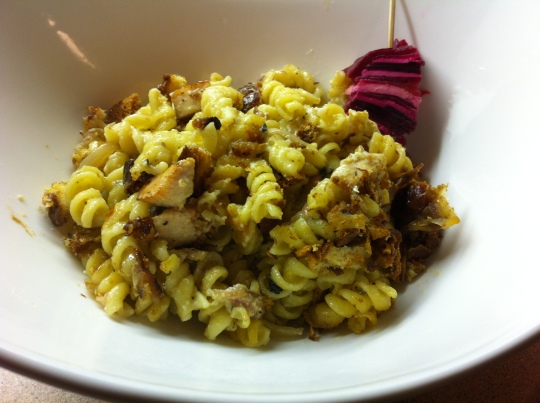
Turkey Macaroni and Cheese topped with stuffing


Bake at 350 degrees for about one half hour, then uncover for about ten minutes till the top crusts up a bit.

There you have it!!

This is a very versatile dish that you can use up all manner of weird left over bits in the fridge!  Only your imagination is your limit!!


Holiday treats017

Yum


Kinda Calzone

I guess to answer my own question of where do people even FIND my blog, I have recently signed up on some site that sends me all kinds of other blogs to read.

I found this one (click here) particularly intriguing, mostly because it was in Swedish!!

It is so interesting how it doesn’t really mater where you are from, people who like food, like food and like to talk about it!

While checking out this particular blog I found a recipe for something called Piroger and thought maybe it might be some sort of Swedish perogi.

Well it wasn’t, but it was a pastry type item filled with a delectable filling……so close enough

I was thrilled to find out that there  is a “translate” button.  I’m not sure if that is something built-in to that particular blogging software or just an internet thing…….but how great!!   So I clicked “translate” and I was in business!

I have to admit that some of the word choices or the sequence in which they are used are a little wonky but at least it gives you a good idea.  So please, I encourage you to not be afraid when you see foreign language food blogs!  You just might find some treasures!!

***********************************************************************************************************************

So I thought I’d give the Piroger a go.    In English they seem to be “Patties with turkey, thyme and paprika” which I admit isn’t quite as exotic but still a nice idea.

I didn’t happen to have any of the ingredients for the filling, but I really liked the idea of baking something tasty inside a bread like bun.

So I started by making up a batch of her dough and letting it sit for 30 minutes, as directed.

Then instead of the turkey filling, I made up a batch of my old favorite Nelson’s Beans and then let them cool right down to room temperature and then added about 3/4 of a cup of parmesan cheese just to thicken them up.

calzone002

What ever you decide to use as a filling and that’s what really excited me about this because I can see using all kinds of different things!  But whatever it is, make sure you make it with a think consistency.   You really don’t want to be putting anything too runny or oozy because it will just be too hard to keep inside the dough!

calzone004

So with my Piroger dough and my Nelson’s beans, I started to assemble my nice little patties.   I did add some salami into some of them because the Chef still likes his meat.

Then, as directed, let them rise for about another 30 minutes, then into a 450 degree oven until they get nice and toasty looking.

calzone005

Serve as you wish.

calzone008

What excites me about these it that they seem a perfect solution to my on going “work lunch” dilemma.   A nice little pocket of goodness that will taste great hot or at room temperature.

Thank you Praline in Sweden!

Super Snack

Well, while the others are all chowin down on chicken wings and nachos today during the big game, why don’t you try THIS one on for size!

Supersnack006

What is it they say?  Necessity is the mother of invention?  Or something like that?

I found myself home alone and completely unsupervised so I didn’t really have much motivation to cook myself anything proper.

So I dug around the kitchen and quite accidentally came up with this and what a fine invention it turned out to be!!

Turn your oven on to broil.

Get a baking sheet.

Slap on a piece of pita bread.

Put it under the broiler for a little, just long enough that it toasts a little.

Take out that try.  Turn over pita.

Toss done a handful of baby or chopped arugula for nice peppery taste.

Cover with a few slices of horseradish cheese  ( I suppose a strong cheddar would do but this horseradish stuff just kills!!).

Sprinkle with a few pine nuts or chopped walnut.

Supersnack002

Put back under the broiler until cheese melts and nuts are toasted.

Bam!

Supersnack004

Super super snack!

You could make  a bunch of them and cut them up and serve as party snacks, or do like I did and have it for dinner with a side salad.

So easy!

Supersnack008

Retro New Years

For those of you who have been following this blog for any length of time well know, that my philosophy towards food is “Do the best you can with what you’ve got!”  And that if you can eat properly 90% of the time, then that 10% when you indulge , shouldn’t really do that much harm.

So, that being said, if you are one of my uber-healthy, vegan, gluten-free, dairy free, etc type blog friends, then, I suggest you just move on from this particular post……..nothing to see here.

I gave the Chef a cheese fondu set for Christmas.  We live in the sort of climate that welcomes bread dipped in molten cheese type dishes, and New Years Eve is a perfect time to indulge!

I was probably about twelve the first time I ever tasted cheese fondu and it was made by ACTUAL Swiss people, new neighbours who had moved in and invited our family over for dinner.

Coming from the “boil it or fry it” cuisine that I grew up with, this “Swiss Fondu” had to be the most exotic and delightful thing my young palette had EVER had!!

And all the ritual around it, with having to kiss the person next to you if you should inadvertently lose your bread in the pot!!

( The Chef pointed out that perhaps this played a part in the 70’s when both fondu parties and swingers were at their peak of popularity!!)

My love of fondu continued in the 90’s, back in Montreal, when my friends and I often frequented a restaurant called Alpenhaus which specialized in fondu.  There was not a better place to be on a cold Montreal night, than tucked into the dark wood laden walls of this Swiss Chalet stuffing your face with warm cheese on bread, to warm the cockles!

So to say good-bye to 2012 we fired up the fondu pot!

Now as the holiday season winds down ( although mine doesn’t finish for another week because January 7th is my birthday so all resolutions in my world start on the 8th!) you really start to feel as though if you NEVER had another meal it would be TOO SOON!!

So we tried to add just a little healthiness to the meal by adding a salad and instead of just bread as dippers, we also had blanched cauliflower, lightly sauted mushrooms……so yes and some (pre-cooked) spicy Italian sausage!

Here’s to 2013!!!

This slideshow requires JavaScript.

Pierogi Stuff Grilled Cheese Sandwich

I know what you are thinking.

That after getting back from our eating orgy in Oregon, that would be it! 

We’d get back on track and get back to “practice what I preach” and healthy eating and all that!

I know, I know but I just HAD to share THIS thing with you…..even if you NEVER eat one, you NEED to know that it is out there….for better or for worse!

Last weekend I was working at the Rifflandia music festival here in Victoria, so for the most part I was sequestered on the site the whole time can couldn’t go off in search of a healthy green smoothie ( although I bet if I looked hard enough, someone was probably making them there!) so I was at the mercy of what was available to eat.

What is nice is that instead of the regular concession stands normally found at these sort of events, they had several of the local food trucks and restaurants set up with their own fare.  This brought a lot of variety and local feel.

I couldn’t keep away from The Hungry Rooster food truck which specializes in pierogi based dishes.  I ate nearly every meal there!  I just couldn’t help it!

But the most note worthy, and what this story is even about, was The Slam Down.

Are you ready for this?   It is a grilled cheese sandwich, stuffed with bacon, grilled onions and PIEROGIES!!!  IN the sandwich!!  I mean seriously?  Could there be a more decadent and wonderous thing??

I didn’t have my camera with me but I talked about my sandwich so much that one of my co-workers broke down and got one herself so here is a picture of hers!

Pierogi stuffed grilled cheese sandwich

Look at the picture of it on the Hungry Rooster site to get a better look and the full list of ingredients.

I told the Chef about this mythical sandwich and he was most intrigued so I thought I would try my hand at making him one for his Sunday breakfast yesterday……

So first you need to cook up some bacon.  Three slices per sandwich.

And then, in the drippings of said bacon ( this is optional if you want it “healthier” which to me is like diet coke with your cheese burger!) cook up one onion sliced so you are getting the longest pieces that you can.  Cook till soft and a little brown.

Then boil up some frozen pierogies, two per sandwich.

Once those are all set to go and keeping warm, you are ready to start.

I just grilled the bread in the oven under the broiler.  I would imagine at the Hungry Rooster they are actually grilling them on the flat top for that grilled deliciousness, but I didn’t want to get int the whole flipping thing!

So grill the bread on one side and then turn it over.

They add “aioli” to theirs which is fancy mayo.  So I just used regular mayonnaise and a bit of Dijon mustard.

Then top each slice of bread with some quality cheddar ( NOT the individually wrapped “cheese food product” IF you know what I mean!) and put the bread back under the broiler till the cheese melts.

Then on one side per sandwich lay out the three strips of bacon, then add a generous mound of fried onions and then finally two pierogies, strategically placed so you can cut the sandwich on the diagonal.

Top with the other slice of cheesy bread and cut in half.

Voila!  Pierogi stuffed grilled cheese sandwich!

Pierogi  stuffed grilled cheese sandwich

I didn’t find it quite as good as the Rooster’s…..didn’t have the same “ooy-gooy-goodness” but then again, I’m sure there is a good reason for that!!

The Chef liked his a lot but commented “I guess I won’t be getting THESE too often!”

Once a year should be the limit!!

Goat Cheese Cakes

Here is a super little snack or appetizer or in this case we just had it with a bunch of dips and a glass of wine for a wonderfully tasty summer supper!

Goat cheese cakes

Here’s what’s in the goat cheese cakes:

  • Goat cheese
  • chopped basil
  • chopped garlic
  • chopped sun-dried tomato
  • chopped jalapeno olives
  • black pepper

Mix all of this very well together in a bowl.  Then take out large spoonfuls of the mixture and make them into little disks or “cakes”.   Then put them on a tray with some parchment paper and then put them in the freezer!

Keep them in the freezer for about 1/2 hour or until they get nice and firm.  This makes them SO much easier to work with.

Then you are going to bread them with the usual process.

  • flour
  • egg
  • breadcrumbs

Then it is time to pan fry them in just a little oil.

Then back to the tray with parchment and into the oven at 350 for about 10 minutes max, just to set them.

Then you are ready to eat!

The Chef told me that he had prepared a salad of “local greens”.  We laughed and laughed, because he just took them from the balcony garden!!  That’s pretty local!

Humus, onion jam, tomato compote

Then we paired them with some lovely tasty dips.

  • spicy humus
  • onion jam
  • tomato compote

I will give you the recipes for these another time!

And then some roasted garlic, assorted olives with crostini and fancy bread!

With a nice glass of wine……nothin beats it!!

Just Because

I don’t really have a very good reason for writing this particular post other than the fact that I have a nice picture to go with it.

The Chef always seems to be very concerned about what I will have for “lunch”.  I haven’t the heart to tell him that most days I don’t actually eat “lunch”  per say.

But he made me these lovely sandwiches.

Don’t you find that sandwiches ALWAYS taste better when someone else makes them??

And don’t sandwiches somehow taste better when presented nicely, with fancy toothpicks and condiments.

Maybe it’s a childhood thing, from when we used to get cute crustless gems.

I don’t know.

Enjoy your sandwich.

***********************************************************************************************

a damn fine sandwich

**********************************************************************************************

Veggie Pie

Well here’s an easy one for you, a quick mid-week supper or a Sunday lunch!

As you may know, I’m a big fan of “clean out the fridge” dishes and this one is a perfect example of that.

You can pretty much use most vegetables that you would cook on this one.

Now when I say “cheated” with ready-made puff pastry……..I’m not really being that outrageous.  I mean I live with a professional Chef and even HE never makes puff pastry from scratch!!

So start with some store-bought puff pastry and roll it out as per manufacturers instructions.

Then cut it into manageable sizes.  Squares or like I have here, sort of round mini pizza sizes.

Roll up the edges slightly because you want to make the inside deep enough so stuff doesn’t run out.

Put on a baking sheet and bake in the oven ( see temp on pastry package)  for about 15 minutes.

Top with your vegetables of choice.

We happened to have some left over roasted squash, already sweet and smokie and perfect for this.

And some carmalized onions and some fresh asparagus.  Arrange them evenly all over the dough.

Then you are going to add:

  • 1 egg
  • 3/4 cup heavy cream
  • salt & pepper

Whipped up together and poured evenly over the vegetables, kind of like if you were making a very thin Quiche.

Finish with your favorite cheese.

Here we have a few knobs of my favorite goat cheese.

Bung them in the oven ( see pastry package for temp).

And bake until the pastry puffs up, the egg and cream set and  the cheese gets melty!

Serve with a side salad and you are in business!

Veggie pie

************************************************************************************************

Very Berry Cakes

I found myself with and abundance of berries.

I use them in smoothies and freeze them and all that but I feel that blackberries in particular kind of annoy me in a smoothie.  I find that the  seeds get caught in your teeth.

I was going to make some muffins but I didn’t have any baking cup liners and didn’t feel like greasing and cleaning and all that nonsense, so I just opted for some pancakes instead.

I always make my batters in the blender because then you can pour it easily into the frying pan.

So start with your favorite pancake recipe.  I use a lot of “groovy” stuff in mine to make them more nutritious, like oatmeal and chia and all that, but any batter will do.

Then add about 1/2 cup or more of black berries, or the berries of your choice.

The black berries make the cakes super purple, which in some circles is kinda cool.

While they are cooking on the first side, I gently add a few blue berries to each cake, that way they stay in one piece and don’t make the cakes double purple!

Keep the cooked ones warm until you are ready to serve.

I didn’t feel like the usual maple syrup so I added a dollop or two of my favorite lemon goat cheese and a few drizzles of honey.

Very Berry Cakes

Very nice way to start the day!

Something Simple

Do you ever crave something just so simple it seems silly??

I had just that craving for my lunch.

How simple was it?  Well let me tell you.

I took a slice of my favorite Dimpilmeier rye bread and lightly toasted it.

Then added a generous layer of Boursin garlic flavoured cheese, then a few slices of beautifully ripened tomato.

A few turns of the pepper mill, a little sprinkle of sea salt and I was in heaven!

Tomato and Boursin on rye

Easy Sunday moring breakfast

Sunday morning breakfast doesn’t always have to be elaborate.     It usually is at our house…….

But yesterday I decided on something simple, but So fulfilling.

Last Saturday afternoon I put on a batch of “Pot Bread to fester so it would be ready to bake Sunday morning.

This particular batch I made with orange zest, chopped almonds and cranberries.

Then when I got up I turned up the oven to 450 degrees, when it got up to temp I popped in my cast iron Dutch oven and let it heat for 30 minutes.

Then I put the dough into the pot and put it back in the over for about another 30 minutes or till it gets golden brown.

cranberry, lemon zest and almond bread

While the bread was baking I set out some toppings.

I started some lovely Salt Spring Island Goat cheese topped with lemon.  And then some plain un-salted sweet butter and some assorted jam.

And then just added a few extras and there you have it, one of the most delicious relaxed breakfasts you could have.


Anniversary Dinner

Now don’t get me wrong, I like going out to restaurants as much as the next person, but when you have a live in Chef sometimes it just doesn’t make any sense to go out!!

The Chef and I were celebrating our anniversary this weekend so he was nice enough to “whip me up” a little something for my dinner!!

We started with an appetizer of beet and goat cheese pin wheel terrine with basil infused oil.

Beet and goat cheese pin wheels

Colourful and light.

Then a lovely salad of arugula  with a beautiful refreshing oil and lemon dressing and shaves of Parmesan cheese.

Arugula salad with lemon, oil and shaved Parmesan cheese

For the main course we had beef and asparagus rouladen topped with gorgonzola cheese, accompanied by pured roasted celeriac topped with Boursin cheese and roasted root vegetables with topped with Blue cheese.

Beef and asparagus rouladen with roasted celeriac, root vegetables and three cheeses

Scurmp-delly-ishes!!!

Needless to say, with all the flavours and textures going on there, it only seemed appropriate to have a nice simple dessert.

Strawberries macerated in sugar and balsamic vinegar with Greek yogurt, with a sprig of mint and a shard of dark chocolate!

macerated strawberries with Greek yogurt and mint

Good time had by all!

Slitty potatoes

Have been seeing these everywhere lately and thought it was time to try them.

I have reason to believe they are really called “Hasselback” potatoes and are originally Swedish in nature.  Although I have seen Laura Calder on the Food Network’s  “French Food at Home make them on her show too so I imagine a few cultures lay claim to them.

So start with some nice potatoes.

Mine weren’t too big, about goose egg size.  That way they cook quicker.

Oh and turn on the oven to 450 degrees.

Wash and dry the potatoes, then very carefully start at one end and make a bunch of evenly spaced slits along the whole length of the potato.

Be careful not to cut all the way through.  You want to stop just short of going through the skin on the bottom.

Meanwhile, and this is up for interpretation, but what I used in this particular incidence was……..

In a small bowl mix a few spoonfuls of soft butter, a couple of shots of olive oil and some very finely chopped fresh rosemary sprigs.   Stir that up well.  You could also just use olive oil if butter isn’t your thing.

Then take each potato and slog on this mixture, being sure to get some down into each slit.

Repeat until they are all covered.  Then give them all a good sprinkle of salt and pepper.

Then bung them in the oven for up to 45 minutes depending on the size of your potatoes.

But obviously keep an eye on them and give them a poke near the end to know if they are done.

Feel free to add a little more butter or what ever you please once they are done!  I’ve added a little blue cheese to mine.

*****************************************************************************************

Serve with your favorite meal.

Pulled chicken tacos

I seem to have gone taco crazy lately.

Not sure why I haven’t enjoyed them more in the past?  I always tended to be more of an enchilada type girl before, but I am finding the taco experience so much lighter and fresher.

Here are some super easy chicken tacos to try.

Start with a good size heavy skillet and add:

  • 1 onion chopped into small cubes

Saute in a little oil till they are nice and translucent

Then I added four frozen  boneless, skinless chicken breasts ( the frozen part was poor planning on my part).  However boneless chicken of any sort will do just fine.  Then I add just enough water to cover them about half way, then put a lid on  and let them simmer a spell.

If you are using fresh chicken, I would brown on all sides and then follow the rest of the recipe.

Once the (frozen) chicken has thawed in the water and turned white it is time to add the rest of the ingredients:

  • 1/2 jar ( or more) of store bought salsa of your choice
  • equal part of water or stock
  • 1 tbsp red wine vinegar

Mix that in evenly and cover again for about 15 minutes at a slight boil, to make sure the chicken is cooked thoroughly.

At this point, test to see if the chicken is done inside by taking two forks and “pulling” the chicken apart.  Resulting in the “pulled chicken” part.

If the chicken comes apart easily, then it is time to add the herbs and spices.   But if you like you can shred up the chicken first, or leave it in the larger pieces and shred it later.  Doesn’t really matter too much.

So then I added and this is just a suggestion, what ever you have, or what ever you like better is fine, but this worked well:

  • 1 tbsp ground cumin
  • 1 tbsp smokie paprika
  • 1 tbsp chili powder ( the kind that is more flavour than hot)
  • 1 tbsp dried oregano
  • 1 tsp ( more or less) of chili flakes
  • 1/2 tsp cinnamon
  • salt & pepper to taste

And if you wanted to take it up just a notch,  add a couple of tsp of brown sugar.

Mix that all in well, cover again and let simmer about another 10 minutes until you are ready to serve.  Add a little more liquid if it gets too dry.

Now you are ready for assembly

I prepared a bit of a “taco bar” so we could dress our own.  Some possibilities are:

  • fresh made guacamole
  • sour cream ( I added chopped cilantro and hot sauce)
  • grated cheese
  • salsa
  • chopped tomato
  • chopped cilantro

Start with the tortilla of your choice ( warmed or not) and start piling on the fixins!

*****************************************************************************************

Pulled chicken tacos

Happy times!

Beet and Goat Cheese Terrine

Every now and again The Chef will see something somewhere and HAS to make it.

Of late we have been watching Top Chef Canada and there is one contestant who seems to be making a lot of terrines, so The Chef had a hankering to make one for us.  I couldn’t refuse.

Now don’t get me wrong, terrines come in all sorts of shapes, sizes and flavours.  But mostly it means a dish full of stuff squished down hard till it sticks together well and then turned out and sliced up and eaten, usually in a decorative way.

So on this occasion, he made one of beet and goat cheese.

Start by boiling some whole beets.  He used red ones and golden ones.

Once they are cooked, let them cool till they are cold.  So this can be done well in advance.

When you are ready to build your terrine, peel the beets slice very thinly with a mandolin or with a knife if you are really good at that kind of thing.

Lay them out on a tray and sprinkle with a little oil, vinegar, salt, pepper and some chopped herbs.

Let them sit a little to get acquainted.

Then find yourself a terrine mould.  If you don’t have a fancy one handed down from generations before you, just use a loaf pan of some sort.

You could line it with plastic wrap if you are making something particularly sticky, but the oil on these beets will keep them slippery enough to come out of the mould.

Start layering the beets, perferablely by colour.

Then a layer of goat cheese.

Repeat.

When you finish your last layer, you will need to find something heavy that you can put on top.

Use your imagination.

The Chef topped it with a bit of parchment paper, then we happend to have one of those silicon, soft loaf pans, so he put that on top next and then a couple of heavy cans of whatever.

Put it in the fridge for a few hours to set.

When you are ready, unmould it, slice it up and serve.

Chicken and Broccoli bake

I had a roommate long ago who used to make something like this.  It was very comforting and I often try to recreate it, but haven’t quite figured it out.

This version does the trick though.

I started with some frozen chicken breasts.   But don’t fret, we can use that to our advantage!

I popped them into a sauce pan with about 4 cups of water, give or take, with a shot of olive oil and about a table-spoon of “poultry seasoning” and a pinch of salt and then put them on to boil.

Meanwhile, I chopped up a nice size onion and browned it up in a bit of oil in a large skillet with a clove or two of chopped garlic.

When they were brown enough, I poured them into a good size casserole dish and spread them evenly on the bottom.

Then I fished the chicken breasts out of the boiling water ( which is now very much like chicken broth!) and popped them into the skillet with the onion flavours still lingering!

Brown the chicken breasts to give them a little colour and a lot more flavour.

While those are browning, wash and chop up a head of broccoli, in hind sight, I would have chopped it smaller than I did, but if you like bigger bits of brocoli feel free to chop them to  the size you like.  Spread them into the casserole over the onion.

I then added a few handfuls of fresh chopped parsley to help give it some colour.

Meanwhile back at the chicken……

As they browned up, I fished them out of the skillet one by one and sliced them into 2-3 bite size morsels then tossed them back in the skillet and repeated till all were cut.  Then I added about 1 tablespoon of Worcestershire sauce to zing it up a bit.

Meanwhile, add two cups of short grain brown rice to the casserole dish and toss everything together making sure everything, especially rice, is coated with any juices or flavours going on in there.

Then arrange  the chicken bits in the casserole in some sort of evenly distributed pattern.

Then get about four cups of the left over “chicken water”  ( thought we were just gonna waste it didn’t you??) and pour it all over everything, making sure that most of the stuff, at least all the rice anyway, is submerged.

I think my roommate used to use a can of “cream of something” type soup in hers and that’s what made it so much more creamy or saucyer than mine.  Feel free to experiment, but just make sure you have double the liquid to whatever the rice amount is.

Then cover tightly with tin foil and place into a 375 oven for at least 45 minutes.

After that time take it out and test the rice to see if it’s done.   If it is, sprinkle the top of everything with a good few handfuls of your favorite grated cheese.   I used smokey cheddar and then replace in the over UNCOVERED under the broiler and turn it up to 500 degrees and watch it closely.   It should only take about 5 minutes or less to melt and brown the cheese.

Your done!

Serve at will!

What’s good about this stuff is, it works well the next day as a work lunch, either re-heated ( but I don’t use micro waves) or at room temperature  it is just as good!

Chicken and Broccoli Bake

Oscar nachos

We didn’t have an Oscar party, but that doesn’t mean that you can’t have some sort of party like food while you watch…….does it?

I whipped up a batch of nachos!  What better and easier, to stuff your face with while you yell at the TV?

First I started with making some fixins to go with them.   The beauty of nachos is that there are really no rules, so you can put anything you like on them!


Nacho fixins

I chopped up some red onion, green onion, tomato.   Then I grated some cheese and squished up some avocados into guacamole.   And then I added a few drops of my favorite Chipolte tabasco sauce to some sour cream.

I took a baking sheet and put down a layer of nacho chips ( use your favorite kind, I used white corn) then I added some left over chili I had kickin around in the fridge.  But make sure you heat it up first to make sure it is properly brought back up to temperature.


I spread that and some pickled hot peppers and then sprinkled some grated cheese.   Then added a few more chips and did the same again.   That way you don’t get that big melted mess in the middle.


Toss them in the oven under the broiler for…..as long as it takes……..just long enough to melt the cheese and the outside chips start to get slightly brown…..or to your taste…..but KEEP AND EYE ON THEM!!


Oscar nachos with all the fixins


Add some fixings and serve immediately.

My Valentines

I know that many of you have expressed envy over the fact that I have a Chef around the house.

And although there are MANY perks to this, there are also a few hazards, like the high risk to your waistline and the fact that there ALWAYS seems to be a lot of dishes!

But on this past Valentines Day this year, I was once again treated to a lovely meal!

Actually it started with a very nice breakfast, simple but effective.

Eggs, cooked inside slices of red pepper that looked very much like heart shapes, on toast, with a bit of cheese.  I couldn’t have been happier!

Heart shaped eggs

Who knows what I had for lunch?  Probably nothing, knowing I would be coming home to a feast.  And a feast it was.

For weeks I have been nagging the Chef to try out something I saw on someone else’s blog.  The other blogger had taken goat cheese, rolled it into balls, breaded them and then deep fried them and then tossed them in hot sauce.  Exactly like you might do with chicken wings!

The Chef, not liking to be outdone, took it up a notch!

Instead of just goat cheese, he used shredded chicken and blue cheese!  So these balls were even closer to a chicken wing!   But then we just dipped ours in hot sauce instead of having them completely covered in them.   

Very tasty! 

Chicken & blue cheese balls

Then we moved on to the “Party Snack Sampler”.  I am a big fan of party snacks so to start with a few to whet my whistle, was very nice.

Tapenade topped goat cheese, hummus and pita. 

And my favorite little Spanakopita!

Spanikopita

Next was a simple salad of bundles of baby greens wrapped in finely sliced cucumber with a nice sun-dried tomato and balsamic dressing.

Then the main event.  asparagus filled ravioli on a mound of puree of sweet roasted butternut squash, topped with brown butter and freshly grated parmesan cheese.

Asparagus ravioli with butternut squash and brown butter

Finally, for dessert, the triple header chocolate delight!!

Home made chocolate pudding, topped with grated chocolate infused whipped cream and a shard of Lindt 70% dark chocolate bar!  

Chocolate Triple Header

Doesn’t get much better than THAT!

I am a lucky girl.

Leftovers stuffed peppers

I had some  black bean and beef chili left over from Superbowl day.

Left over chili is always good just on its own but I needed to jazz it up just a bit.

Here’s what you’ll need:

A few bell peppers ( what ever colour you enjoy).  Wash them and put them on a baking sheet in the over at 350 degrees for only about 10 minutes, just to take the “bite” off them.

Meanwhile, cook up a cup of brown rice ( you could use the cooked rice of your choice) and then mixed it with the heated left over chili.

Take the peppers out of the oven and let cool enough till you can touch them.   Cut off the top and scoop out the seeds and veins and then stuff them with the rice and chili mixture.  

You could also add some grated cheese at this point if you were so inclined, but I didn’t on this particular occasion.

Put the stuffed peppers back in the oven for about 10 – 15 minutes till everything is nicely heated through.

Serve alone or with your favorite accompaniment!   Quick dinner.


Chili and rice stuffed peppers