Good things to eat

Posts tagged ‘Side dishes’

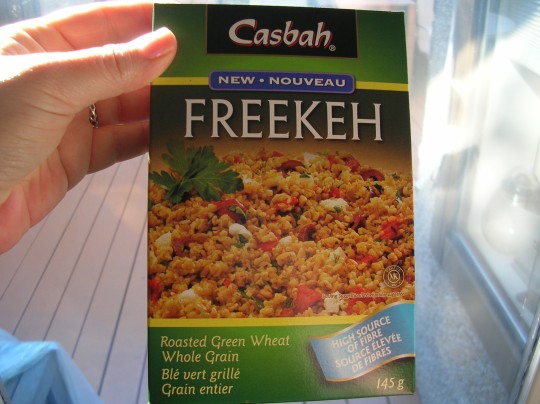
Getting my “Freekeh” on!

I’m kind of embarrassed  that a girl like me has never used the “ancient grain”  freekeh before.

I think I must have seen it on one of the cooking shows  and made a mental note to try it, but simply never got around to it.  So when I saw it on sale at my local store that mental note kicked in again and I picked up a box.

Freekeh

*********************************************************************************************************

I looked it up on line to see what exactly I could do with it and found that the options are endless.   Because essentially freekeh could be used in any way that you might use rice. The big difference is that unfortunately it is NOT gluten free for those of you who can’t tolerate it.  Oh well.

But for those of you who don’t have a problem with gluten, I suggest that you might like to try it.

I started with my  heavy bottomed pot with a lid and heated a little oil and then added:

  • one diced onion

and cooked till translucent, then added the well rinsed ( read the instructions on the package) freekeh into the pot and stirred it well to coat in oil and onion flavour!

Let cook for a couple of minutes and then add your water or stock, bring to a boil, turn down, cover with lid and simmer till done.  Just like you would with rice.

*********************************************************************************************************

Freekeh

*********************************************************************************************************

Just before serving, I stirred in a few toasted pine nuts and chopped almonds just to give it that Middle Eastern vibe but didn’t add too much else because I wanted to get a good sense of what it tasted like.

Freekeh

We really enjoyed it, found it much nuttier and chewier than rice and then it has this smokey flavour to it that really sets it apart from all the other grain products that can be used like this.  It was also quite filling and substantial feeling in your belly so you wouldn’t have to eat as much to feel satisfied.

I liked it a lot and now just need to source out a place that sells it in bulk because the package it came in was quite small and fairly pricy for what it was.

Please let me know if you have ever used Freekeh and what your experience has been with it.  I’d love to know.

nutrition

Cranberry Glazed Sausage

I usually reserve these ones for special occasions.

Or at the very least, near holidays where cranberries are more appropriate!

But hey, why not live a little!!

Cranberry glazed sausage

Cranberry glazed sausage

It is terribly simple really and it was quite by accident that I ever made them.  I think I found myself with some overly dry sausage one Christmas morning and wanted moisten them up a little and the idea made sense.

Fry up a batch of your favorite breakfast sausage and then when they are as good as done, give them a generous splash of cranberry juice, or even the “cranberry cocktail” type stuff.  But I would advise against the jelly in a can type stuff.

Mile zero003

Bring the liquid to a boil and just keep stirring everything around until the liquid is almost evaporated and you are left with a sticky, tasty goo on your sausages.

Mile zero004

Okay, maybe “goo” isn’t the best word, but it is a little thicker than regular glaze.

Mile zero006

Serve with your favorite breakfast food…….like French toast maybe.

But I realized as I wrote  this that I see no real good reason to limit the idea to only breakfast sausage.   In fact I think this might work really well on turkey sausage for instance!!

Because it is cranberry and a little bit tart, it has a really nice balance and isn’t too sweet so it can work with other sweet or savory items!

Mile zero010

I don’t think you will be sorry.

Kinda lasagna sorta

The worst part about moving of course, is trying to find anything!

All the best and most organized packing in the world can still result in a lot of things being “misplaced”.  That is what is so disruptive about moving and makes you feel so unsafe.

I’ve probably mentioned this before, but they say moving is up there with the top 10 most stressful happenings in life……up there with divorce or deaths!!

And when you are packing, you tend to do crazy things that must seem a good idea at the time and perhaps even logical.  But on the unpacking end you often find your self asking “WHAT was I thinking there??”

So this past weekend was the first time the Chef and I have both had the whole weekend off together and been able really get a handle on the new place.  Most of the stuff has been unpacked for a bit, but that doesn’t necessarily mean it is in the right place.

I kid you not, we spent almost four hours arranging and rearranging the living room.        We purchased some new furniture that will be arriving in “two to four weeks” so it is even harder when you don’t even really know what things will look like.

We had already had a number of configurations that we had tried for a week or a few days at a time, but nothing felt right.   But I think we finally found one we can work with……until the furniture comes and then we have to start all over of course!

But we did manage to finally arrange the pantry.

It’s been hard to cook or eat because we didn’t know where anything was….or if you thought of a dish you might only have half the ingredients, but then only to discover in a different cupboard the other stuff you would need.  It’s been chaos!

So after a long day of “arranging” neither of us felt like going out to a store, nor did we really feel like cooking but…….you gotta eat right?

So this is what I came up with.

Baked cabbage with cheese and veg

*********************************************************************************************

I present this as only a guideline of what you can do with a bunch of random stuff.  Please feel free to substitute or omit  as needed.

First I cooked up a pot of green lentils.  At first I thought I would make some sort of lentil dish fried up with onions and veg on rice etc.

But then I found a cabbage in the fridge.  When I say “found” you know what I mean, a recently purchased one, not one that came with the fridge!

And so I thought I’d really like to use that too.

There were also some nice Portobello mushrooms and some red peppers.

Hmmm….what next?

Okay.

So in a large skillet with a little oil add:

  • 1 -2 chopped onion
  • 1-2 cups sliced mushroom
  • 1 red, green, yellow or combo sliced pepper

Cook those down until nice and soft, feel free to add any herb or spice flavours that inspire you.

When these are cooked, toss them into a flat baking or lasagna style dish and spread them around.

Then add in the cooked lentils and mix them in well.

Meanwhile, in the same skillet, add a little more oil then add finely sliced cabbage.  Sliced very thin like you are making coleslaw but don’t stuff the pan too much.

I used a whole small cabbage.  But cook it in batches so that it cooks down nicely and it is okay if it gets brown bits on it.  Adds flavour!!

As you finish each batch of cabbage, add it to the baking dish and continue to mix it in with the other vegetables.

Once you have done about half the cabbage, sprinkle with a layer of good melting cheese like mozzarella or other cheese you might use in a lasagna or pizza.

Once all the cabbage is added then add a tin of tomato  or prepared spaghetti sauce and thoroughly mix through everything.  I only had half of a tin on hand, but it really needed a whole one!

Once it is well mixed, layer with another layer of the melting cheese and then a bit of what ever other cheese you might have just as an accent.  I used some orange cheddar and some blue cheese.

Then bung it in the oven at 350 for about half hour ( it’s mostly all cooked just need to heat and melt cheese) and then pop it under the broiler for a few minutes till the cheese on top starts to brown a little.

There you have it!

Kinda lasagna sorta

Now I will admit, if I had to do it again, there would be a few things I would do differently.  Like make sure I had enough sauce.   And I would probably put some extra fried onions on top.  Or even better, those old school crispy onions that Grandmothers seem to like to put on green bean casseroles at the holidays!!

It would make a fine Vegetarian supper with a salad and some nice bread.  Or actually it would do fine as a side dish.

The point is, you can usually make something out of nothing when you have to!  Be creative!

We did end up getting to have some Thanksgiving Turkey dinner after all and it went very well, just missing a couple things…..like the gravy ladle.

It will show up….with the damn blue lampshade I can’t seem to find.

Savory Bread Pudding

Here’s another little gem you might want to enjoy over the holidays……..

I call it a “savory bread pudding” but I’m sure you could come up with other names for it.

Savory Bread Pudding

This could be used as a nice alternative to stuffing (dressing) if you are still looking for a bready side dish without all the turkey bother.  It does have dairy and eggs, but no turkey juice, so the vegetarians can eat this.

Here is what you will need:

  • aprox 3 cups of cubed bread of some kind
  • 1 onion or shallot finely diced
  • 1 cup of mushrooms of your choice, sliced
  • 1 -2 cups of chopped baby spinach ( depending on how much you chop it)
  • salt & pepper
  • 1 tsp dried thyme ( or poultry spice if you have that)
  • 3 eggs
  • 1 cup of 1/2 & 1/2 cream ( or whipping cream if you are inclined)
  • few dashes of hot sauce
  • some cheese ( I used some good white cheddar and a little bit of blue and parmesan cause I had it)

Heat the oven to 375 degrees and grease a pan with butter or olive oil.

Then in a frying pan with a bit of butter or olive oil, saute the onion and mushrooms, then add the thyme or PS and the S&P.

Meanwhile, cube your bread into 1/4 or 1/2 inch cubes and add them to your greased pan.  Then add in your cooked onions and mushrooms and toss them all together.

*************************************************************************************************************

Then lay on a layer of spinach and a good handful or two of the cheddar cheese and then stir those into all the other stuff till everything is thoroughly mixed.

***********************************************************************************************************8

Then is a separate bowl, beat the eggs with the cream and the hot sauce.

Then pour the eggs and cream all over the bread then kind of swirl it around to make sure everyone is getting a little of the creamy love!

Even squeeze the bread down into the cream a bit to make sure it is all getting a bit soaked.

Then finish with a few sprinkles of the other cheeses like some blue cheese and parmesan.

Pop into the hot oven for at least 1/2 hour and then have a look at it.  Giggle it a bit, if it is still too wabbly, put it back in for a few minutes.

Then you might want to put it under the broiler for a few minutes just to brown off the top.

*************************************************************************************************************

*************************************************************************************************************

To be honest, I probably could have just eaten a big bowl of the stuff by itself.   But instead I used it as a side dish with a spicy sausage stuffed Portobello mushroom.

************************************************************************************************************

But I definitely feel it is worthy of a holiday side dish!

Potato Cakes

Some people call them potato LATKES while others call them potato pancakes.  Although in my opinion the pancake is just that…..a more of a pan cake item.

But whatever you want to call them, one thing would have to be yummy!

Click here to look at wonderful pictures of potato products!

Whether you are making them for a traditional meal like a Hanukkah feast, a fancy brunch or like I did as just a tasty side dish, it is pretty much all the same technique give or take, unless your Bubby tells you different!!

Here is what you will need:

  • 1 poundish peeled potato ( I used half yam for extra nutrients!)
  • 1/2 a medium onion
  • 1 egg lightly beaten
  • 1/2 cup or more flour
  • a sprinkle  ( 1/2 tsp) of salt & pepper

After you have peeled the potatoes you will need to grate them.   If you are doing it by hand, you will need to keep the grated potato in a dish of cold water so they don’t discolour on you.

But if you are a slacker like me and grate them in the food processor which only takes seconds…..they don’t even seem to have time to go brown!!

So grate you potatoes as you will and then grate the onion, but DON’T put the onions in the water!!

Once you have both items nicely grated and ready to go, put them together in a CLEAN tea towel and squeeze the dickens out of them over the sink!  This is an important step if you want nice crispy cakes!

After you have squeezed them……try and squeeze them a bit more…..or get someone with bigger hands to have a go!

Then dump that out of the towel into a mixing bowl ( make sure you dump out the  soaking water!).

Working quickly…….add the flour, egg and seasonings.

Mix it all up very well, with your hands is best, making sure that all of the potato is covered with flour and egg.

Meanwhile, heat up some nice oil in a shallow ( non stick is most effective) fry pan.   Just enough to cover the bottom of the pan, no need to have them swimming!

Once the oil is hot, add in spoonfuls of your potato mixture and squeeze them down so that as much surface as possible is touching the pan.

The size is your choice depending on what you are going to do with them.   You can have small ones like I am doing this time, or one big honkin one that takes up the whole pan.

Whatever you like.

Cook till you see they are starting to crisp on the bottom then CAREFULLY turn them over.

Once done, place on a baking sheet lined in parchment or even a bit of paper towel and keep them in a very low oven just to stay warm till you are ready to eat.

The traditional accoutrements are apple sauce or sour cream.

But as you can see, I’ve just used them as my “potato side dish” with dinner.

Have fun.

Potato Cakes

Warning:  These ARE addictive.

Stuffed Portobello Mushrooms

This one is a great summer time crowd pleaser and great for a bar b que.   They are also very versatile because you can literally stuff them with anything.

Stuffed Portobello Mushrooms

But today I have done them with a spicy Italian sausage filling.   Here’s how it goes based on enough for two mushrooms:

  • Portobello mushrooms, cleaned up and stem removed
  • mushroom stems finely chopped
  • 1/2 pound bulk Italian sausage meat
  • 1/4 cup bread crumbs
  • 1/2 bell pepper diced small ( I used red and yellow for colour)
  • 1 tbsp dried oregano

Mix up very well.  I just use my hands to which is much easier than mixing with a spoon!  Once the mixture is mixed take half of it and jam it into the mushroom cap.  Make sure it is well stuffed and then push it down some more and smooth it out till it is well in there and not over flowing.

Repeat with the other.

Place in a casserole dish and cover with tin foil and put in a 350 oven for about 30 – 40 minutes.

Now if it were me, I would do this regardless of whether or not I was bar b queuing them, just to make sure they are well cooked.   They can always be finished on the BB or reheated there.   But I guess it is up to you and your confidence in the BB situation.

After the suggested cooking time, remove tin foil.   I then topped with some grated smokie cheddar ( or cheese of your choice) and put them under the broiler for 5 – 10 minutes till the cheese melts and starts to brown a little.

Serve with your favorite sides!

********************************************************************************************************

These really are easily made for anyone though.   You could use ground beef instead or a combo of rice and lentils and veg and or all kinds of combos!   I would suggest if you aren’t using something as “juicy” as sausage to put a few drops of olive oil in the bottom of the mushroom before adding other fillings so that it doesn’t become too dry.

You could probably have a different stuffed mushroom every night for an entire summer and never have the same one twice!

Let me know if you come up with any wild ones!

Stuffed Peppers three ways

The Chef is a fan of three ways.

You know, when it comes to preparing dishes.    He really likes taking one ingredient and preparing three different versions of the same item.

The other night he made three different coloured peppers stuffed with three different stuffings!

Let’s break down the fillings.

Filling # one:

  • corn
  • black beans
  • cooked rice

Filling # two:

  • cooked green lentils
  • green olives
  • chopped cilantro
  • chopped parsley
  • 1 clove minced garlic

Filling # three:

  • cooked red lentils
  • crushed tomato ( or tomato sauce)
  • sun dried tomatoes

Feel free to add anything extra that you might like, but these are the basic ingredients.

So make up all these different fillings separately.

I know all that  seems like a lot of work, but just keep the left overs because they make great “salad” accompaniments for your lunch for the rest of the week!!

Cut the peppers in half removing the insides.  Sprinkle with a little olive oil and bake at 350 for about 12 minutes till they are a bit wilted.

Then stuff each pepper with one of the fillings, try to make the colour contrasts interesting.  Or not.

These particular versions are all Vegan, but if you wanted to add some cheese on top to melt in, that would be very tasty too.

Bake for about 15 minutes or until they are heated through.

Stuffed peppers three ways

Enjoy with side salad or other veg.

Slitty potatoes

Have been seeing these everywhere lately and thought it was time to try them.

I have reason to believe they are really called “Hasselback” potatoes and are originally Swedish in nature.  Although I have seen Laura Calder on the Food Network’s  “French Food at Home make them on her show too so I imagine a few cultures lay claim to them.

So start with some nice potatoes.

Mine weren’t too big, about goose egg size.  That way they cook quicker.

Oh and turn on the oven to 450 degrees.

Wash and dry the potatoes, then very carefully start at one end and make a bunch of evenly spaced slits along the whole length of the potato.

Be careful not to cut all the way through.  You want to stop just short of going through the skin on the bottom.

Meanwhile, and this is up for interpretation, but what I used in this particular incidence was……..

In a small bowl mix a few spoonfuls of soft butter, a couple of shots of olive oil and some very finely chopped fresh rosemary sprigs.   Stir that up well.  You could also just use olive oil if butter isn’t your thing.

Then take each potato and slog on this mixture, being sure to get some down into each slit.

Repeat until they are all covered.  Then give them all a good sprinkle of salt and pepper.

Then bung them in the oven for up to 45 minutes depending on the size of your potatoes.

But obviously keep an eye on them and give them a poke near the end to know if they are done.

Feel free to add a little more butter or what ever you please once they are done!  I’ve added a little blue cheese to mine.

*****************************************************************************************

Serve with your favorite meal.

Beet and Goat Cheese Terrine

Every now and again The Chef will see something somewhere and HAS to make it.

Of late we have been watching Top Chef Canada and there is one contestant who seems to be making a lot of terrines, so The Chef had a hankering to make one for us.  I couldn’t refuse.

Now don’t get me wrong, terrines come in all sorts of shapes, sizes and flavours.  But mostly it means a dish full of stuff squished down hard till it sticks together well and then turned out and sliced up and eaten, usually in a decorative way.

So on this occasion, he made one of beet and goat cheese.

Start by boiling some whole beets.  He used red ones and golden ones.

Once they are cooked, let them cool till they are cold.  So this can be done well in advance.

When you are ready to build your terrine, peel the beets slice very thinly with a mandolin or with a knife if you are really good at that kind of thing.

Lay them out on a tray and sprinkle with a little oil, vinegar, salt, pepper and some chopped herbs.

Let them sit a little to get acquainted.

Then find yourself a terrine mould.  If you don’t have a fancy one handed down from generations before you, just use a loaf pan of some sort.

You could line it with plastic wrap if you are making something particularly sticky, but the oil on these beets will keep them slippery enough to come out of the mould.

Start layering the beets, perferablely by colour.

Then a layer of goat cheese.

Repeat.

When you finish your last layer, you will need to find something heavy that you can put on top.

Use your imagination.

The Chef topped it with a bit of parchment paper, then we happend to have one of those silicon, soft loaf pans, so he put that on top next and then a couple of heavy cans of whatever.

Put it in the fridge for a few hours to set.

When you are ready, unmould it, slice it up and serve.

Leftovers stuffed peppers

I had some  black bean and beef chili left over from Superbowl day.

Left over chili is always good just on its own but I needed to jazz it up just a bit.

Here’s what you’ll need:

A few bell peppers ( what ever colour you enjoy).  Wash them and put them on a baking sheet in the over at 350 degrees for only about 10 minutes, just to take the “bite” off them.

Meanwhile, cook up a cup of brown rice ( you could use the cooked rice of your choice) and then mixed it with the heated left over chili.

Take the peppers out of the oven and let cool enough till you can touch them.   Cut off the top and scoop out the seeds and veins and then stuff them with the rice and chili mixture.  

You could also add some grated cheese at this point if you were so inclined, but I didn’t on this particular occasion.

Put the stuffed peppers back in the oven for about 10 – 15 minutes till everything is nicely heated through.

Serve alone or with your favorite accompaniment!   Quick dinner.


Chili and rice stuffed peppers

Squash sauce

Squash squash everywhere!

It is that time of year and what with Canadian Thanksgiving rapidly approaching it’s time to dust off your squash recipes!

Squash squash everywhere!

I had some left over squash soup  ( click here for that recipe ) from the other day that needed used up but wasn’t really enough for both of us  to eat as actual soup, so what to do?

Well…..

I made squash sauce of course.

Extremely simple.  Put the soup in a sauce pan ( does that automatically make it sauce??) and add a little stock or water to it to thin it out.  Then I took the hand blender to it to blend up the hunks of kale and mushrooms that I so carefully added to it when I was making the soup!

THEN I added a good glob of Boursin cheese and melted that down into it.

Presto chango now you have a beautiful rich sauce for your topping pleasure!!

We had it on some grilled chicken which I put on top of some left over spaghetti squash that I sauted with some garlic, onion and a little butter.   And then a side of brown rice and broccoli and you have a pretty healthy meal chalk full of hidden vegetables!!

Chicken with squash sauce

Roasted tomato pancakes

If you saw my recipe for KALE pancakes earlier this year  ( click here to check them out ) you know that I am a big fan of savory pancakes.

I just really prefer them as the “starch” item on the plate, to rice or noodles or potato.   They have so much more flavour and soak up the flavours of whatever you put on top of them.

Here is a different version, roasted tomatoes.

So to start with roast off some grape or other small cute tomatoes  ( click here to see where we’ve done that before ).

Then make up a batch of your favorite pancake batter only omitting whatever sweetener it calls for.  Or just use the kale pancake recipe for a double whammy of goodness!

If using regular pancake batter add a clove or two of fresh garlic and a few leaves of fresh basil or 1 tbsp of  dried.   Make sure it is mixed well ( I do them in the blender) and then let the batter rest a little before you start.

When you are ready, heat the pan, and pour your first or first few pancakes depending on if you are doing big ones or a few small ones.

THEN strategically add the roasted tomatoes.

Strategically place roasted tomatoes

Let the pancakes bubble as one normally would with pancakes, flip and repeat!

Keep them warm while you make the rest of them.

Roasted grape tomato pancake

Now you are ready to pile her up with whatever you like!

************************************************************************************************

Roasted yam

Now that you have your kale pancakes, you’ll need something to put on them.

Here’s what I happened to make this time.

First the roasted yam.

Heat your oven to 350 degrees, then in a glass casserole dish add:

  • Large diced yam
  • Large diced onion
  • a drizzle of olive oil
  • sprinkle of salt and pepper

When I’m going to roast yams like this I usually first cut them into rounds.

Then I cut those rounds down the middle and then into either quarters or sixths depending on the size of the round.  This assures that you are getting a bit of skin on every part of your dice, which gets nice and crispy when you roast them.

Then dice up a regular onion into nice chunky bits and then toss all of the ingredients together in your roasting pan.

Bake until the onions are caramelized and the potatoes get a nice brown on them.  Crispy on the outside and soft in the centre.

This is a delightful combination because they are both sweet and savory at the same time.

The roasted yam is a great side dish at anytime.